springboot问题整理
SpringBoot项目搭建
-
新建Empty Project
-
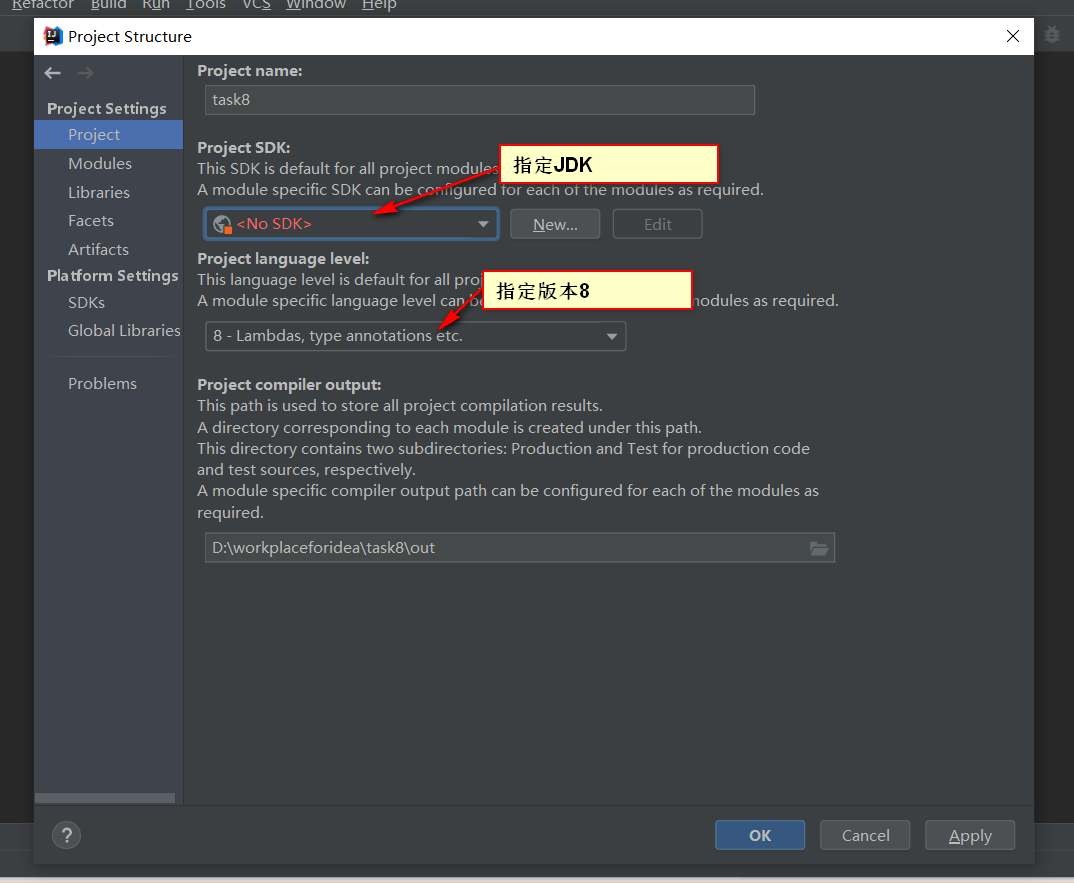
-
新建module,Spring initializer创建springboot项目,
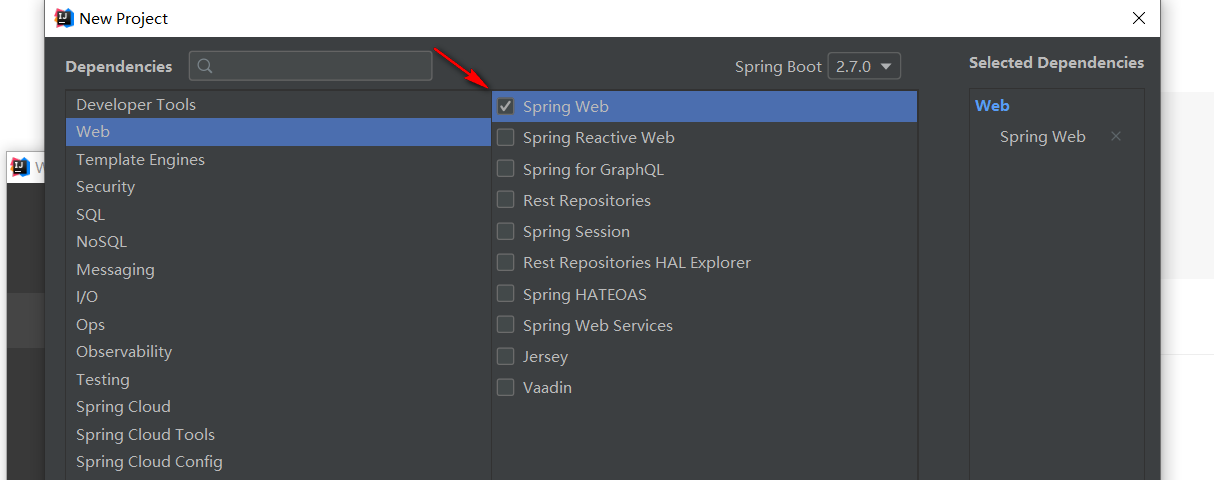
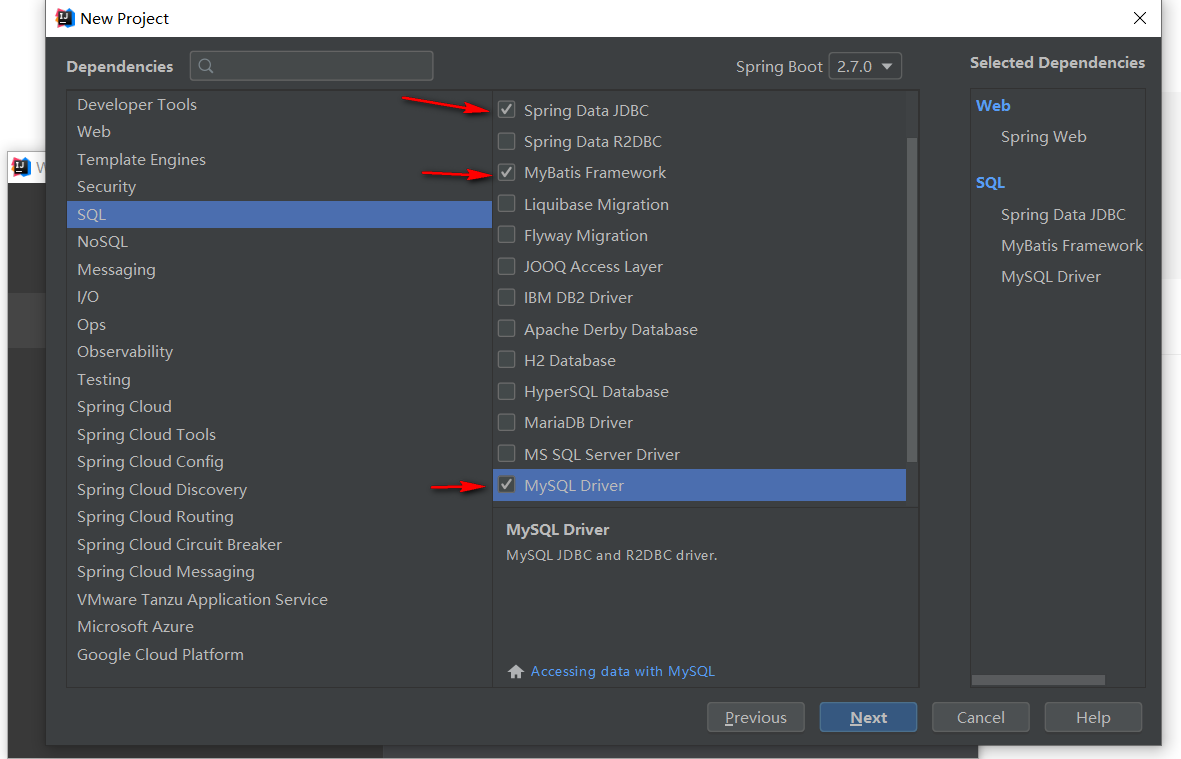
-
导入jar包
1
2
3
4
5
6
7
8
9
10
11
12
13
14
15
16
17
18
19
20
21
22
23
24
25
26
27
28
29
30
31
32
33
34
35
36
37
38
39
40
41
42
43
44
45
46
47
48
49
50
51
52
53
54
55
56
57
58
59
60<dependencies>
<dependency>
<groupId>org.springframework.boot</groupId>
<artifactId>spring-boot-starter-data-jdbc</artifactId>
</dependency>
<dependency>
<groupId>org.springframework.boot</groupId>
<artifactId>spring-boot-starter-web</artifactId>
</dependency>
<dependency>
<groupId>org.mybatis.spring.boot</groupId>
<artifactId>mybatis-spring-boot-starter</artifactId>
<version>2.2.2</version>
</dependency>
<dependency>
<groupId>mysql</groupId>
<artifactId>mysql-connector-java</artifactId>
<scope>runtime</scope>
</dependency>
<dependency>
<groupId>org.springframework.boot</groupId>
<artifactId>spring-boot-starter-test</artifactId>
<scope>test</scope>
</dependency>
<!--导入lombok-->
<dependency>
<groupId>org.projectlombok</groupId>
<artifactId>lombok</artifactId>
</dependency>
<!--引入外部tomcat的支持-->
<dependency>
<groupId>org.apache.tomcat.embed</groupId>
<artifactId>tomcat-embed-jasper</artifactId>
</dependency>
<!--引入标签库的支持-->
<dependency>
<groupId>jstl</groupId>
<artifactId>jstl</artifactId>
<version>1.2</version>
</dependency>
<!-- 不引入这个访问jsp页面会报404错误-->
<dependency>
<groupId>taglibs</groupId>
<artifactId>standard</artifactId>
<version>1.1.2</version>
</dependency>
<!--热部署依赖-->
<dependency>
<groupId>org.springframework.boot</groupId>
<artifactId>spring-boot-devtools</artifactId>
<optional>true</optional>
</dependency>
<!--pagehelper分页的依赖-->
<dependency>
<groupId>com.github.pagehelper</groupId>
<artifactId>pagehelper</artifactId>
<version>5.1.2</version>
</dependency>
</dependencies> -
生成webApp文件夹和Web.xml文件
-
配置application.properties
1
2
3
4
5
6
7
spring.datasource.username=root
spring.datasource.password=
spring.datasource.url=jdbc:mysql://localhost:3306/userManager?useUnicode=true&characterEncoding=UTF-8&serverTimezone=UTC
spring.datasource.driver-class-name=com.mysql.cj.jdbc.Driver
spring.mvc.view.prefix=/WEB-INF/jsp/
spring.mvc.view.suffix=.jsp或者选择application.yml
1
2
3
4
5
6
7
8
9
10
11
12
13
14
15
16
17
#配置数据源
spring:
datasource:
username: root
password:
url: jdbc:mysql://localhost:3306/movie?useUnicode=true&characterEncoding=UTF-8&serverTimezone=UTC
driver-class-name: com.mysql.cj.jdbc.Driver
#配置视图解析器
mvc:
view:
suffix: .jsp
prefix: /jsp/
#配置mapper的存放路径以及实体类别名
mybatis:
mapper-locations: classpath:mapper/*.xml
type-aliases-package: com.ruanyuan.pojo
config-location: classpath:mybatis-config.xml -
环境配置基本完毕。
怎么将html转换为jsp
-
直接在原testPage.html页面最顶端添加如下代码:
1
<%@ page language="java" contentType="text/html; charset=UTF-8" pageEncoding="UTF-8"%>
-
修改文件后缀名: 修改后缀名为
.jsp,Ok即可。
Springboot+Thymeleaf配置与使用
-
在application.properties文件中增加Thymeleaf模板的配置。
1
spring.thymeleaf.cache=false
在开发时建议将spring.thymeleaf.cache设置为false,否则会有缓存,导致页面没法及时看到更新后的效果。
比如你修改了一个文件,已经update到tomcat,但刷新页面还是之前的页面,就是因为缓存引起的。 -
在pom.xml中添加thymeleaf的依赖
1
2
3
4<dependency>
<groupId>org.springframework.boot</groupId>
<artifactId>spring-boot-starter-thymeleaf</artifactId>
</dependency> -
<html lang="en" xmlns:th="http://www.thymeleaf.org">1
2
3
4
5
6
7
8
9
10
# driver-class-name: com.mysql.cj.jdbc.Driver 报错的几种解决办法
`pom.xml`文件中
```xml
<dependency>
<groupId>mysql</groupId>
<artifactId>mysql-connector-java</artifactId>
</dependency>
@PathVariable注解使用
@PathVariable是spring3.0的一个新功能:接收请求路径中占位符的值
语法:
@PathVariable(“xxx”)
通过 @PathVariable 可以将URL中占位符参数{xxx}绑定到处理器类的方法形参中@PathVariable(“xxx“)@RequestMapping(value=”user/{id}/{name}”)
请求路径:http://localhost:8080/hello/show5/1/james
@RequestParam注解的详细介绍
@RequestParam (org.springframework.web.bind.annotation.RequestParam)用于将指定的请求参数赋值给方法中的形参。
有三个属性:
- value:请求参数名(必须配置)
- required:是否必需,默认为 true,即 请求中必须包含该参数,如果没有包含,将会抛出异常(可选配置)
- defaultValue:默认值,如果设置了该值,required 将自动设为 false,无论你是否配置了required,配置了什么值,都是 false(可选配置)
mybatis——mapper文件详解,mapper文件样例
mapper文件样例
1 |
|
MyBatis一对一关联查询
单步查询
1 | <resultMap id="BookWithAuthorAndCategoryAndPublisher" type="com.ruanyuan.pojo.Book"> |
MyBatis select标签
select 示例语句如下。
1 | <select id="selectAllWebsite" resultType="net.biancheng.po.Website" parameterType="string"> |
下面介绍 select 标签中常用的属性。
| 属性名称 | 描 述 | 备注 |
|---|---|---|
| resultType | SQL 语句执行后返回的类型(全限定名或者别名)。如果是集合类型,返回的是集合元素的类型,返回时可以使用 resultType 或 resultMap 之一 |
SQL DELETE 语句
1 | DELETE FROM 表名称 WHERE 列名称 = 值 |
thymeleaf模板中,html如何获取前台的session中的值(干货)
前端代码

拦截器配置不生效
检查是否添加了@Configuration注解

SpringBoot连接数据库报错:Access denied for user ‘root‘@‘localhost‘ (using password: YES)
SpringBoot连接数据库报错:Access denied for user ‘***’@‘localhost’ (using password: YES)
它报三个***,这个就很恶心了!找了很久,大多数都说是权限问题,刚开始我也以为是权限,后面弄得数据库都连接不上了!!!后面才发现和那些没有一点关系!
原因是因为我们在创建springboot的时候它自动给我们在properties中创建了连接对象!
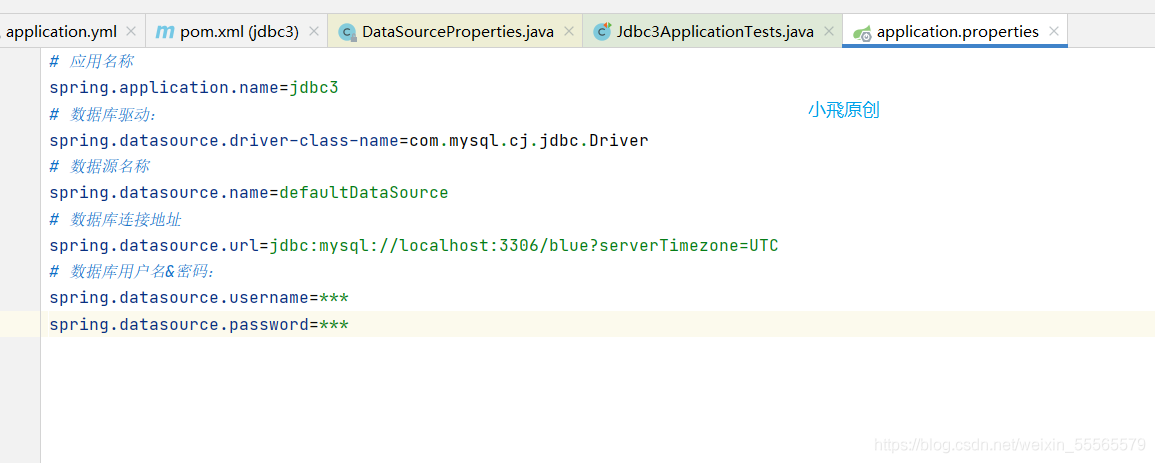
这个时候只需要选择一个配置就OK了!!!
druid控制台无法监控sql问题,druid登录配置完了还是不需要账号密码
-
在Spring的数据库配置参数里开启监控并配置druid(yml形式)
1
2
3
4
5
6
7
8
9
10
11
12
13
14
15
16
17
18
19
20
21
22
23
24
25
26
27
28
29
30
31
32
33spring:
datasource:
driver-class-name: com.mysql.cj.jdbc.Driver
username: root
# 假如时区报错了,就增加一个时区的配置就ok了 serverTimezone=UTC
url: jdbc:mysql://localhost:3306/mybatis_plus?useUnicode=true&characterEncoding=utf8&characterSetResults=utf8&useSSL=false
password: asd123
type: com.alibaba.druid.pool.DruidDataSource
#没有这条druid控制台无法监控sql
#用于SQL状态监控,stat代表状态,wall代表防火墙
filters: stat,wall
#Spring Boot 默认是不注入这些属性值的,需要自己绑定
#druid 数据源专有配置
initialSize: 5
minIdle: 5
maxActive: 20
maxWait: 60000
timeBetweenEvictionRunsMillis: 60000
minEvictableIdleTimeMillis: 300000
validationQuery: SELECT 1 FROM DUAL
testWhileIdle: true
testOnBorrow: false
testOnReturn: false
poolPreparedStatements: true
#配置监控统计拦截的filters,stat:监控统计、log4j:日志记录、wall:防御sql注入
#如果允许时报错 java.lang.ClassNotFoundException: org.apache.log4j.Priority
#则导入 log4j 依赖即可,Maven 地址:https://mvnrepository.com/artifact/log4j/
log4j filters: stat,wall,log4j
maxPoolPreparedStatementPerConnectionSize: 20
useGlobalDataSourceStat: true
connectionProperties: druid.stat.mergeSql=true;druid.stat.slowSqlMillis=500
#配置监控统计拦截的filters,去掉后监控界面sql将无法统计
spring.datasource.filters: stat -
加入druid配置类
1
2
3
4
5
6
7
8
9
10
11
12
13
14
15
16
17
18
19
20
21
22
23
24
25
26
27
28
29
30
31
32
33
34
35
36
37
38
39
40
41
42
43
44
45
46
47
48
49
50
51
52
53
54
55
56
57
58
59
60
61
62
63
64
65
66
67
68
69
70
71
72package com.kuang.config;
import com.alibaba.druid.pool.DruidDataSource;
import com.alibaba.druid.support.http.ResourceServlet;
import com.alibaba.druid.support.http.StatViewServlet;
import com.alibaba.druid.support.http.WebStatFilter;
import org.springframework.boot.context.properties.ConfigurationProperties;
import org.springframework.boot.web.servlet.FilterRegistrationBean;
import org.springframework.boot.web.servlet.ServletRegistrationBean;
import org.springframework.context.annotation.Bean;
import org.springframework.context.annotation.Configuration;
import javax.servlet.Filter;
import javax.sql.DataSource;
import java.util.Arrays;
import java.util.HashMap;
import java.util.Map;
/**
* TODO
*
* @ClassName DruidConfig
* @Author Alfa
* @Data 2022/7/11 9:24
* @Version 1.0
**/
public class DruidConfig {
public DataSource druid(){
return new DruidDataSource();
}
/**
* 配置一个druid的监控
* 1、配置一个druid的后台 管理servlet
* 2、配置一个druid的filter
*/
//1、配置一个druid的后台 管理servlet
public ServletRegistrationBean servletRegistrationBean(){
//注意,请求时 /druid/*
ServletRegistrationBean<StatViewServlet> bean = new ServletRegistrationBean(new StatViewServlet(),"/druid/*");
Map<String,String> initParm= new HashMap<>();
//登陆页面账户与密码
initParm.put(ResourceServlet.PARAM_NAME_USERNAME,"root");
initParm.put(ResourceServlet.PARAM_NAME_PASSWORD,"aabbcc");
//监控后台 允许ip
initParm.put(ResourceServlet.PARAM_NAME_ALLOW,"");
//黑名单
initParm.put(ResourceServlet.PARAM_NAME_DENY,"192.168.0.1");
bean.setInitParameters(initParm);
return bean;
}
// 2、配置一个druid的filter
public FilterRegistrationBean webStatFilter(){
FilterRegistrationBean<Filter> bean = new FilterRegistrationBean<>();
bean.setFilter(new WebStatFilter());
// 可以过滤那些请求?
Map<String, String> initPrams = new HashMap<>();
// 这些东西不进行统计
initPrams.put(WebStatFilter.PARAM_NAME_EXCLUSIONS,"*.js,*.css,/druid/*");
bean.setInitParameters(initPrams);
//设置拦截器请求
bean.setUrlPatterns(Arrays.asList("/"));
return bean;
}
}
springboot有关type-aliases-package设置,xml别名爆红错误
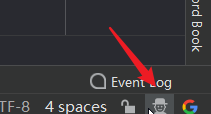
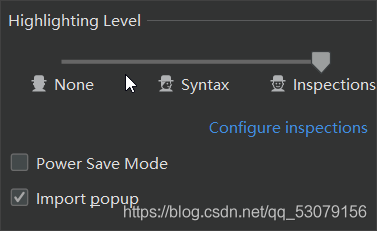
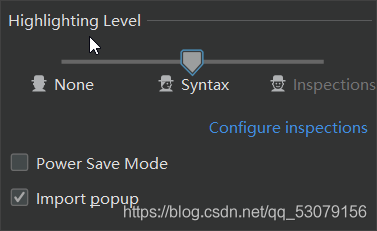
把IDEA设置的检查级别调低,默认是inspections,这个词的意思是检查的意思,就是会对你的代码进行静态检查,就像findbugs那样,如果你能把代码改进到消除inspections级别的所有警告,那么你的代码质量已经相当好了。
但是很难把这个级别的警告消除干净,例如最常见的代码重复就很难消除,Intellij 甚至把不同modules的代码都会检查重复,而不同modules的重复代码难以合并。
当你嫌警告太多,可以设置为syntax也就是语法级别。这个级别只会检查语法是否正确,这个级别和eclipse或myeclipse是一样的,提前发现你代码的编译错误。
平时可以使用这个级别保持界面清爽,而审查代码的时候开开inspections级别进行更严格的代码质量检查。
@MapperScan和@ComponentScan的区别
首先,@ComponentScan是组件扫描注解,用来扫描@Controller @Service @Repository这类,主要就是定义扫描的路径从中找出标志了需要装配的类到Spring容器中
其次,@MapperScan 是扫描mapper类的注解,就不用在每个mapper类上加@MapperScan了
这两个注解是可以同时使用的。
————————————————
版权声明:本文为CSDN博主「海角cape」的原创文章,遵循CC 4.0 BY-SA版权协议,转载请附上原文出处链接及本声明。
原文链接:https://blog.csdn.net/m0_37597572/article/details/82625631


